Preliminary Task
This is our Preliminary Task in which we had to film ourselves doing a number of different tasks such as opening a door, sitting down at a table and having a conversation between two characters. For or Preliminary task I feel that we have done all of criteria needed.
Production Schedule
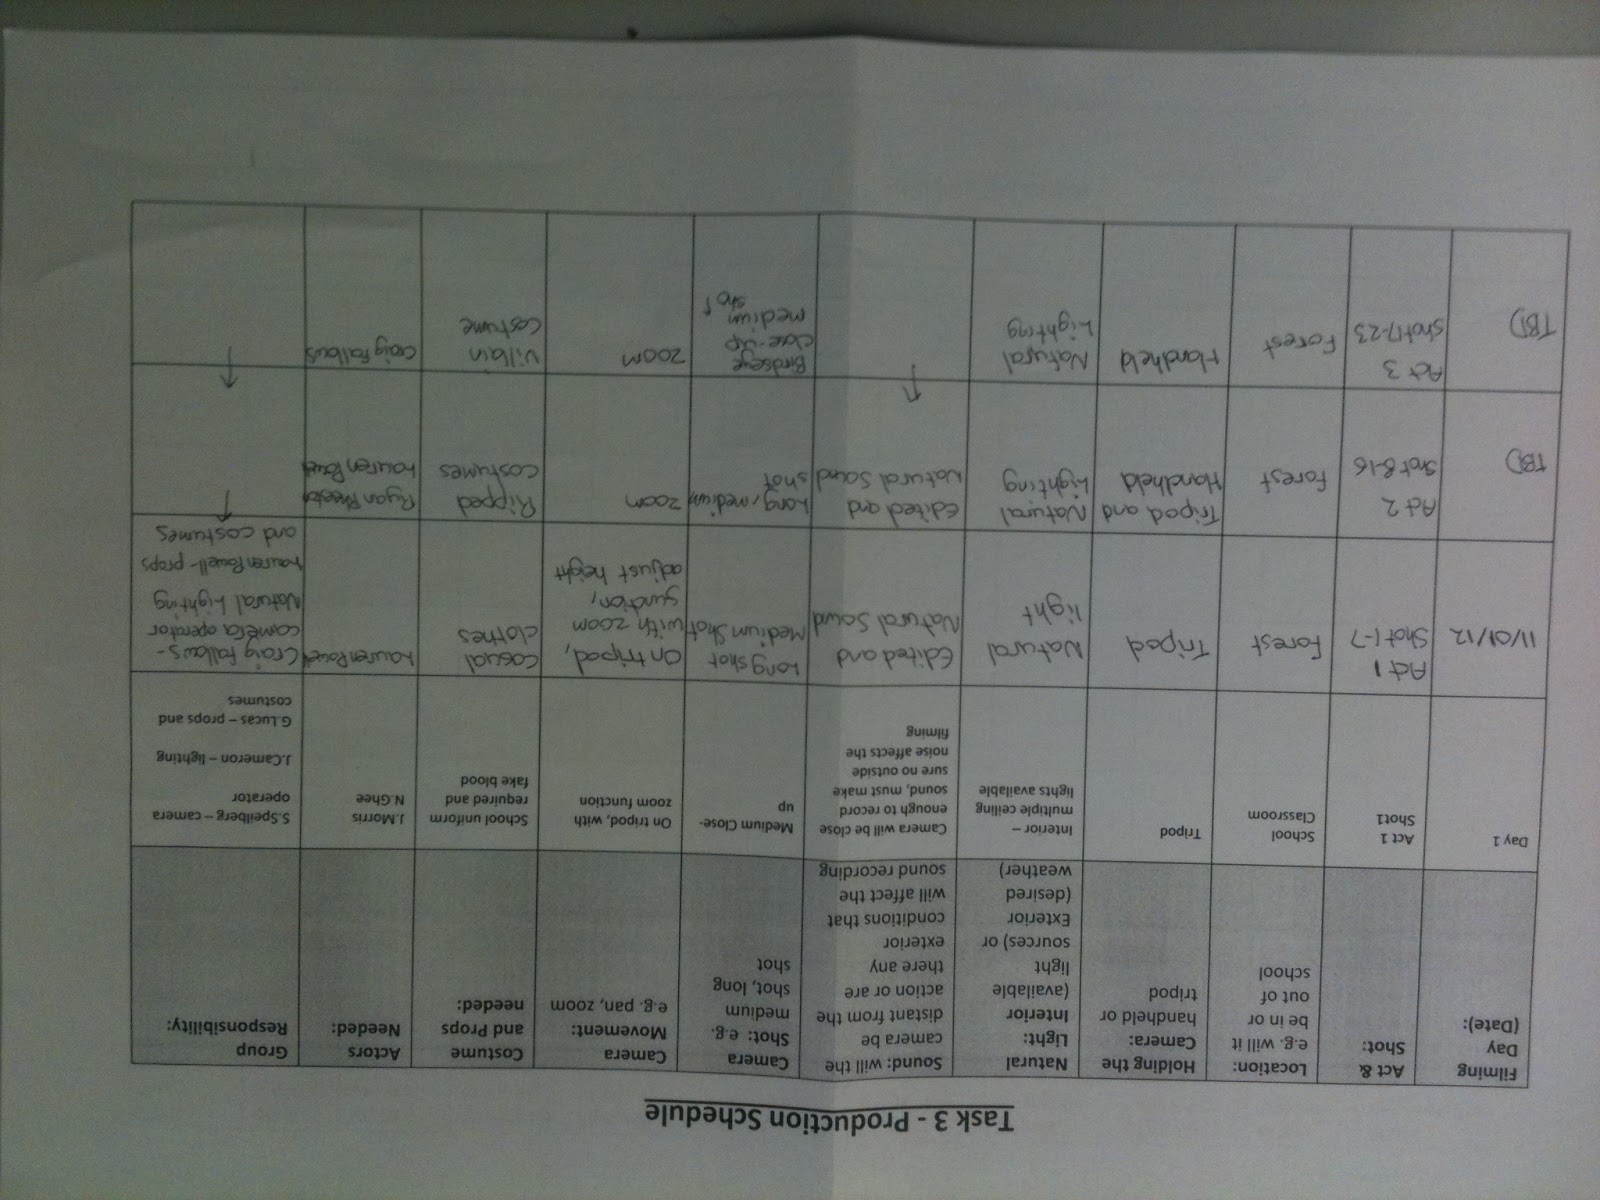
This is the production schedule that my group and I produced to know when we are filming along with the different dates we were filming, what we hoped to accomplish, and any props we would need.


Film Opening Audience Evaluation
This is our audience review for our film opening, we have asked questions that give us the best feedback for our project, and questions that can help us improve, and also test the success of our film opening.
Film Opening Evaluation
This is me and my group evaluatiing our film opening, we have ensured that we have covered all of the topics needed, and that we have added the correct amoutn of detail that produces the right message and gives out the needed infroamtion to the audience.
Location Scouting
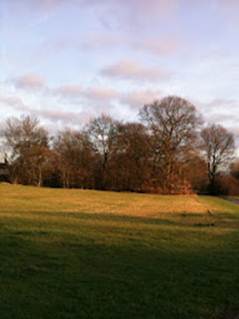


When choosing the location for our filiming, we firstly set out by idenifying the lcoaion we needed and took pictures of it, this was to see whetehr it was sutiable to correctly set our mood, and whether it would help achieve what we wnated to with our film. These pictures have been taken at Sheldon Country park, which is locaed near the airport.
Media Film Opening Production Final Draft
After making the draft for our film production, we then made changes and improvements to help our media film opening not only look better and help the plot to make compelte sense, but also to appeal more to the target audience.
Media Film Opening Production Draft
Wrong Direction : Media film opening draft 1
This is the draft production for our film opening, after completeing the filming, and then afterwards the editing for our opening, we nopticed that there were problems that may hold us back and lower the quality of the opening. We will now make changes to this piece, by firstly making sure that the narrative makes sense, and also that the shots we have put together are in a good order and appeal to the audience.
Animatic Diary Entry
Today during our flexible learning day we first of all finished our groups storyboard, adding in all the appropriate text and colouring the images to make them look good. We then scanned the images onto the computer using Paint Shop Pro 7, and then copied all the images into Windows Movie Maker. Using these images, we then put them into the correct order of our storyboard, and edited each image, to make them move/make them look like a short film sequence. We also added other images that were drawn on Paint to ensure the animatic looked as realistic as possible.
The problems that we encountered throughout the day were that at the start of the day we did not have the correct equipment, and the computers power was not working, we overcome this by contacting the technician and having the problem resolved. Another problem that we encountered was that we struggled with time to complete our work, we overcome this by using some our pictures for other shots aswell, so this saved time with drawing extra shots and colouring. A final problem that we encountered was that we didn't finish all of our storyboard in the time available, we overcome this by completing what little we had left to do in the next lesson.

What went well in our group was that we worked well as a team, and completed our work to a good standard, we also worked hard on our animatic and had no trouble editing the images and shots to make it look good.
Here is our anamatic:
Here is our anamatic:
Preliminary Research
Continuity Editing: This is when one shot moves onto another will a smooth clean change, that is very unrecognisable to the audience, and doesn't create disorientation. One example of filming that does not do this is Discontinued filming, used in foreign films mostly, and shows the change of shot very clearly, causing somewhat confused to the narrative.
It includes two different categories of cutting; one is Temporal cutting, which connects shots together to support the narrative development. It may be linear progression or not, and can include flashbacks and flash forwards, these are both used to establish the progression of time.
The other category is Spatial cutting, which creates unified space through editing the shots from different angles and framing. This includes things such as shot/reverse shot, the Kuleshov effect, and parallel editing.
Spatial Editing: This is the act of placing the shot of one location, with a shot from another, and using them to construct film narrative in any imaginable way.
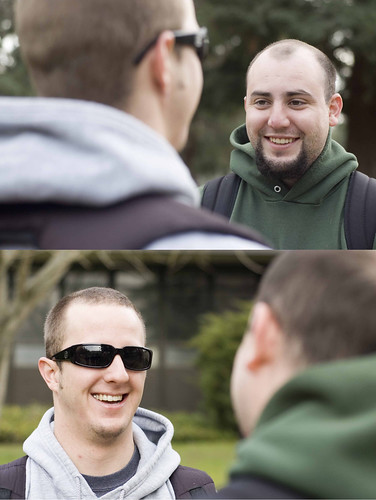
Another form of editing that is used in Spatial editing is the shot/reverse shot, which is a little similar to the 180 degree rule, as two cameras are placed behind each characters that are having a conversation, and the whole conversation is filmed over the shoulder, but is kept stationary. This also shows the characters emotions and reactions to what is being said. An example is below.


I think that continuity editing is important when filming because it is essential that the transition between shots is as smooth as possible to ensure that the audience has maximum enjoyment form the film and that no attention is drawn to the change in shot.
Websites:
http://en.wikipedia.org/wiki/Continuity_editing
https://blogger.googleusercontent.com/img/b/R29vZ2xl/AVvXsEisMnECPaWDfHYrz7hkCyk-V2PeWqUdJPgOvu8IzjcCXfXDyWkjZtLrjXdriZekb_bNtIA_zOXqqgd_sKFNqrVIA4ZjEezH1v5R_Cxi-gIiYOy2emKSkkT1yB8cLpvyMVIromGrg8rXekSM/s1600/shot+reverse+shot.jpg
http://farm1.static.flickr.com/241/452559072_d3f437d0e9.jpg?v=0
Filmogrpahy:
Pulp Fiction 1994 (Quentin Tarantino)
The Anchorman 2004 (Adam McKay)
It includes two different categories of cutting; one is Temporal cutting, which connects shots together to support the narrative development. It may be linear progression or not, and can include flashbacks and flash forwards, these are both used to establish the progression of time.
The other category is Spatial cutting, which creates unified space through editing the shots from different angles and framing. This includes things such as shot/reverse shot, the Kuleshov effect, and parallel editing.
Spatial Editing: This is the act of placing the shot of one location, with a shot from another, and using them to construct film narrative in any imaginable way.
Within this form of editing, there is the 180 degree rule, which states that, in the 360 degree radius of the set, when filming direction interaction between 2 characters, that all cameras and camera movement mist be on one side of the set only, covering '180 degrees'. Within this side of the set, there is two cameras, one behind each character that will film the opposite characters reactions, and can be edited to make a short interaction/conversation. This is done to prevent disorientation of the audience, and make the scene look natural. The only exception to this rule, if the camera, is moved via dolly/tracking over the one half of the set, but the movement is made clear to the audience. Below is an example taken from Pulp Fiction.

The last form of editing that is used in Spatial editing is the Match on Action shot, which is when an action shot is filmed, possibly a character reading a book. And the shot is cut half way through the action, and another filmed shot is placed directly after this cut, showing the certain action carried on, but in a different shot, often zoomed in. An example is below and is taken from The Anchorman.

Websites:
http://en.wikipedia.org/wiki/Continuity_editing
https://blogger.googleusercontent.com/img/b/R29vZ2xl/AVvXsEisMnECPaWDfHYrz7hkCyk-V2PeWqUdJPgOvu8IzjcCXfXDyWkjZtLrjXdriZekb_bNtIA_zOXqqgd_sKFNqrVIA4ZjEezH1v5R_Cxi-gIiYOy2emKSkkT1yB8cLpvyMVIromGrg8rXekSM/s1600/shot+reverse+shot.jpg
http://farm1.static.flickr.com/241/452559072_d3f437d0e9.jpg?v=0
Filmogrpahy:
Pulp Fiction 1994 (Quentin Tarantino)
The Anchorman 2004 (Adam McKay)
Subscribe to:
Posts (Atom)